
This is part 2 of a 2-part series on CI/CD for “infrastructure as code” on Azure. In part 1, we covered a basic pipeline building application and provisioning infrastructure codified as Terraform templates and Ansible playbooks. While it demonstrated how infrastructure is treated as a code – stored, versioned, and audited – there is still room for configuration drifts and the time required to update the configuration on the server could make auto-scaling challenging. Configuration updates using Ansible also require SSH ports to be open. These and some other considerations are addressed in this tutorial.
Below we’ll demonstrate how to build immutable infrastructure for Azure using Visual Studio Team Services (VSTS) as continuous integration and delivery (CI/CD) and popular HashiCorp and Red Hat tools. Some of the challenges today when building infrastructure are predictability and automated recovery. We need to promote the exact same artifact that was tested into production to ensure consistent behavior. And it is essential to be able to recover the system to the last known to work state. Solving these and other problems such as configuration drift and snowflake servers are the main benefits of building immutable infrastructure.
So, what is immutable infrastructure? It’s a process where instead of having to worry about updating many moving parts at all layers of the application, the whole machine image is promoted, unchanged, from environment to environment. The downside is that building an image takes a lot more time than just running the update script, but that might be solved by layering the images.
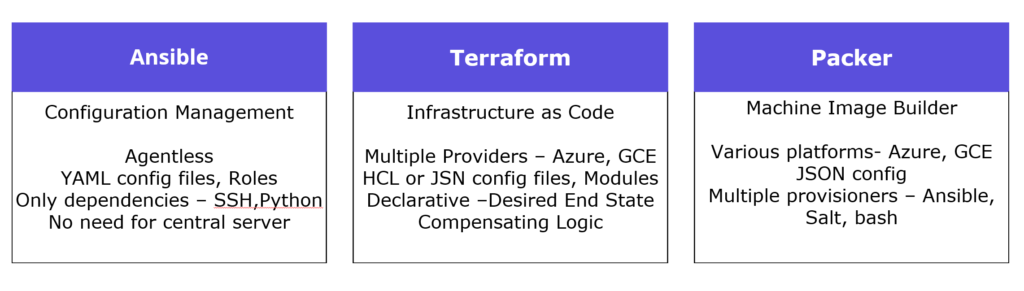
In this post the following tools are used to demonstrate the power of using CI/CD for immutable infrastructure builds:
 This is the flow implemented in this post:
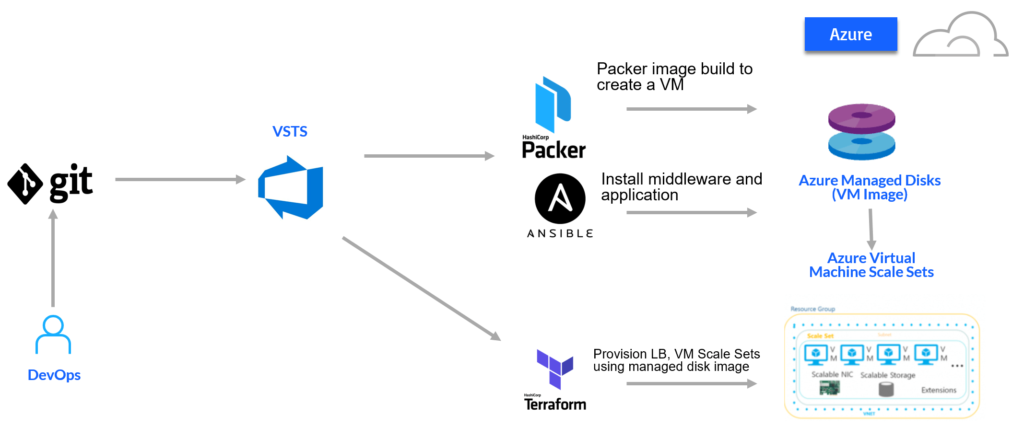
- DevOps commit code or configuration change
- VSTS Build builds and packages application
- VSTS Release invokes Packer to build a Linux image and store it in Managed Disks
- Packer invokes the Ansible Playbook provisioner to install JDK, Tomcat and SpringBoot application
- VSTS Release invokes Terraform to provision Infrastructure and uses Packer build image
Prerequisites:
- Configure custom VSTS agent with required tools as described in “How to create a custom VSTS agent on Azure ACI with Terraform“
- Service Principal with access to the Subscription
- Resource Group in which managed disks will be created
- Storage Account/Container to save Terraform state in (update “backend.tfvars” in the Terraform templates below with the storage account names).
Terraform must store state about your managed infrastructure and configuration. This state is used by Terraform to map real world resources to your configuration, keep track of metadata, and to improve performance for large infrastructures. - Ansible task extension installed from VSTS marketplace
Spring Boot Application Build
The application used for this example is the Java Spring Boot application from part 1 of this tutorial. First, we build and package the Spring Boot application using Gradle. You can import the full build definition from this GitHub repository or create a Java Gradle project from scratch by following the steps provided in this documentation: “Build your Java app with Gradle.” Here is outline of the steps and commands customizations:
- Create a build definition (Build & Release tab > Builds).
- Search and use “Gradle” definition.
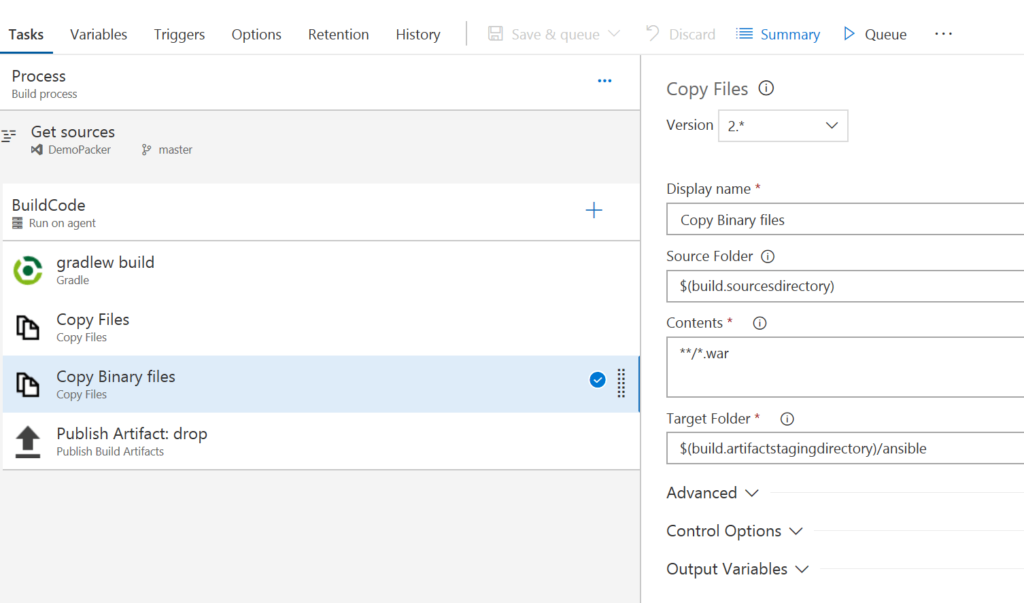
In the repository tab of build definition make sure the repository selected is the one where you pushed (Git). - In ”Copy Files” – customize the step to copy all required scripts directories with templates to resulting artifact.
ansible/**
terraform/**
packer/**
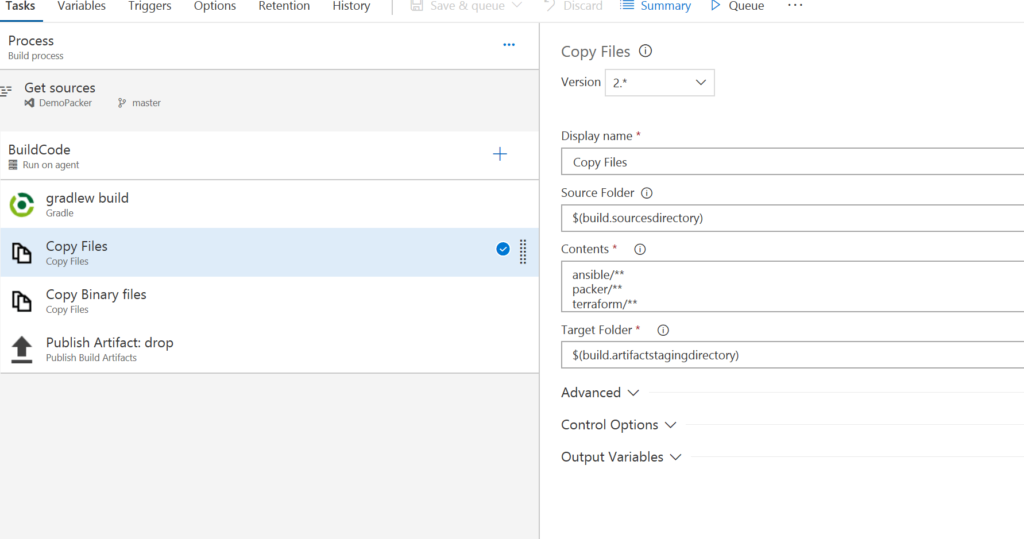 4. Add an additional “Copy Files” step, which will copy the Java WAR file to the resulting build artifact.
 On the Triggers tab, enable continuous integration (CI). This tells the system to queue a build whenever new code is committed. Save and queue the build.
Infrastructure Provisioning
In this flow, Packer builds an Azure VM image and uses Ansible as the provisioner. Ansible Playbook installs the required software (Apache) and application on the server. The completed image is saved in Azure Managed disks. Terraform is used to build the infrastructure based on the Packer image.
Here is the Release pipeline definition, which can be imported from GitHub.
Deployment Flow
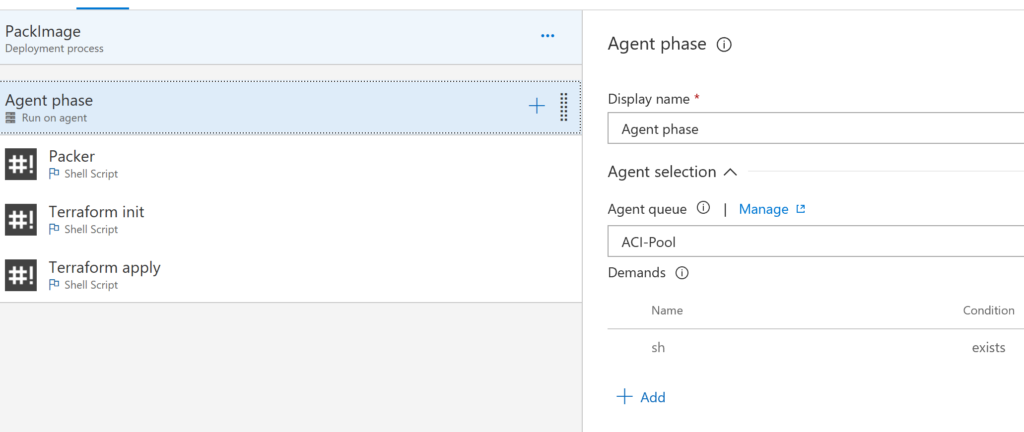
1. Start by defining Empty Release Definition, and link the build prepared above as an artifact.
2. Use custom VSTS Agent from “ACI-Pool”
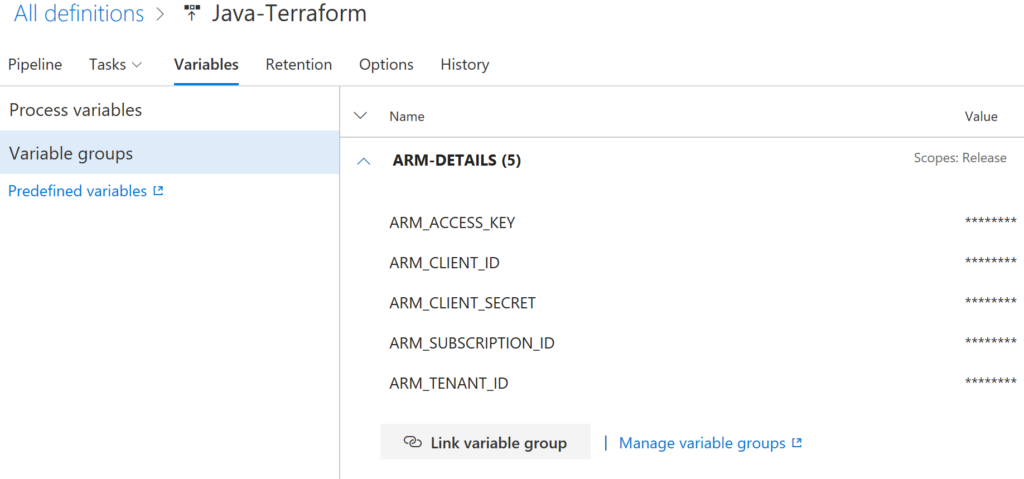
3. Define Variable Group with environment variables that provide connectivity to subscription – ARM_SUBSCRIPTION_ID, ARM_TENANT_ID. Service Principle – ARM_CLIENT_ID, ARM_CLIENT_SECRET. And Storage account access key – ARM_ACCESS_KEY.
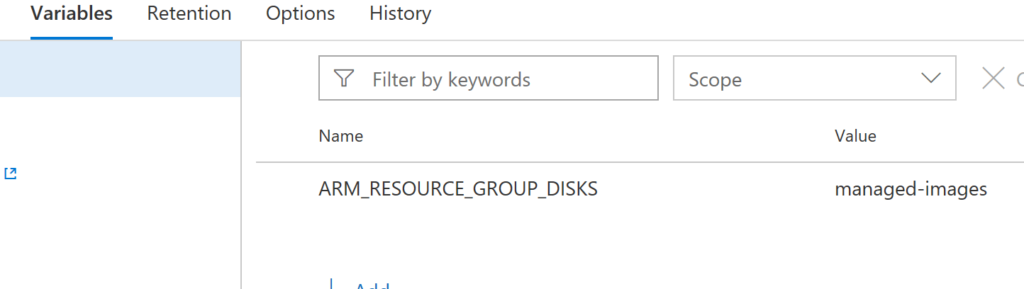
 And Variable ARM_RESOURCE_GROUP_DISKS that has the name of resource group to store the images.
 4. Add these steps:
a. Packer build- invoke shell script to build image
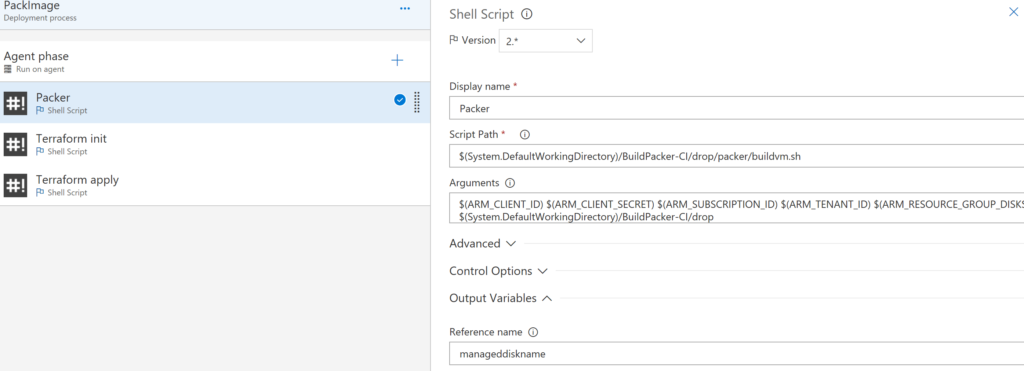 Script executes the Packer template and sets the VSTS output variable “manageddiskname” to the disk created by Packer. This image will be used by Terraform to point VM ScaleSets to.
#!/bin/bash
## execute packer build and send out to packer-build-output file
packer build -var playbook_drop_path=$6 ./app.json 2>&1 | tee packer-build-output.log
## export output variable to VSTS
export manageddiskname=$(cat packer-build-output.log | grep ManagedImageName: | awk '{print $2}')
echo "variable $manageddiskname"
echo "##vso[task.setvariable variable=manageddiskname]$manageddiskname"
Packer template uses Azure builder to create image based on Red Hat and saves it in Managed Disk in the provided resource group (name includes timestamp for ease of identification).
{
  "variables": {
    "tenant_id": "{{env `ARM_TENANT_ID`}}",
    "client_id": "{{env `ARM_CLIENT_ID`}}",
    "client_secret": "{{env `ARM_CLIENT_SECRET`}}",
    "managed_resource_group": "{{env `ARM_RESOURCE_GROUP_DISKS`}}",
    "subscription_id": "{{env `ARM_SUBSCRIPTION_ID`}}",
    "playbook_drop_path": "",
    "random_path": "{{timestamp}}"
  },
  "builders": [{
    "type": "azure-arm",
    "client_id": "{{user `client_id`}}",
    "client_secret": "{{user `client_secret`}}",
    "subscription_id": "{{user `subscription_id`}}",
    "tenant_id": "{{user `tenant_id`}}",
    "os_type": "Linux",
    "image_publisher": "RedHat",
    "image_offer": "RHEL",
    "image_sku": "7.3",
    "managed_image_resource_group_name": "{{user `managed_resource_group`}}",
    "managed_image_name": "demoPackerImage-{{isotime \"2006-01-02_03_04_05\"}}",
    "location": "Canada Central",
    "vm_size": "Basic_A1"
  }
To install the required components and application we are using Ansible Playbook. To invoke it, define a provisioner in the Packer template. First, we use shell provisioner to install Ansible, then “Ansible-local” to invoke the playbook on the image being created, and then shutdown the VM.
"provisioners": [
    {
      "execute_command": "chmod +x {{ .Path }}; {{ .Vars }} sudo -E sh '{{ .Path }}'",
      "inline": [
        "sudo yum install –f ansible"
       ],
      "inline_shebang": "/bin/sh -x",
      "type": "shell"
    },
    {
      "type": "ansible-local",
      "playbook_file": "{{user `playbook_drop_path`}}/ansible/site.yml",
      "playbook_dir": "{{user `playbook_drop_path`}}/ansible"
    },
    {
    "execute_command": "chmod +x {{ .Path }}; {{ .Vars }} sudo -E sh '{{ .Path }}'",
    "inline": [
      "/usr/sbin/waagent -force -deprovision+user && export HISTSIZE=0 && sync"
    ],
    "inline_shebang": "/bin/sh -x",
    "type": "shell"
    }
  ]
}
Resulting image will have all the components installed using Ansible playbook. This solution does not require SSH to be enabled on the VM as it uses local provisioner.
Note: For Ansible to find all the roles and subdirectories “playbook_dir” should be specified. It will direct Ansible to copy all directory and subfolders to the staging directory, where Ansible provisioner is invoked in.
The Ansible Playbook used in the example (same as in Part 1) is running on localhost, installs JDK, Tomcat, and the Java Spring Boot application.
---
- hosts: 127.0.0.1
  become: true
  connection: local
  vars:
    http_port: 8080
    https_port: 8443
    admin_username: admin
    admin_password: adminsecret
  roles:
    - selinux
    - tomcat
Tomcat Role snippet installing the application:
- name: wait for tomcat to start
  wait_for: port={{http_port}}
- name: unDeploy sample app
  file: path=/usr/share/tomcat/webapps/spring-music.war owner=tomcat group=tomcat state=absent
- name: wait for tomcat to undeploy the app
  wait_for: path=/usr/share/tomcat/webapps/spring-music/ state=absent
- name: Deploy sample app
  copy: src=web/build/libs/spring-music.war dest=/usr/share/tomcat/webapps/spring-music.war owner=tomcat group=tomcat
  notify: restart tomcat
- name: Start Tomcat
  service: name=tomcat state=started enabled=yes
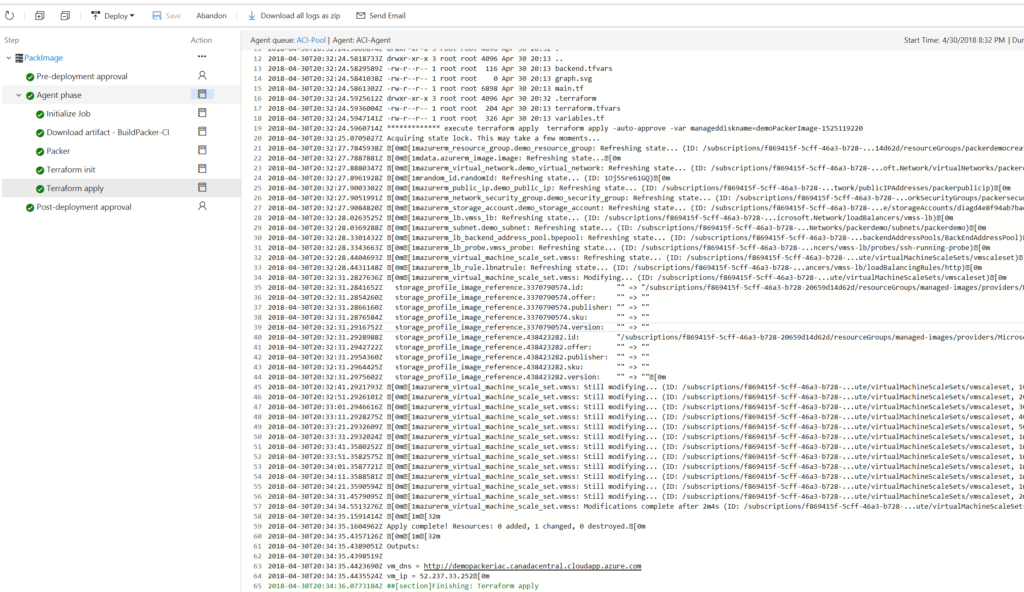
As a result, we can see the image build built, the Ansible Playbook run, and the managed disk name as an output of the task.
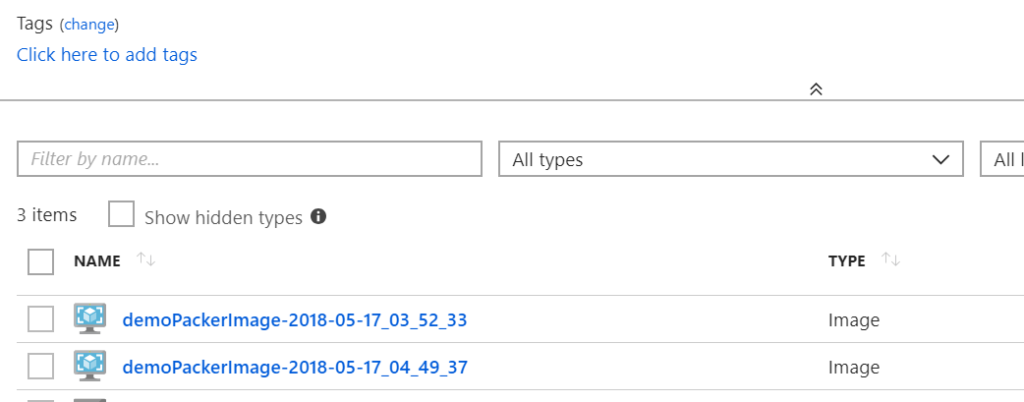
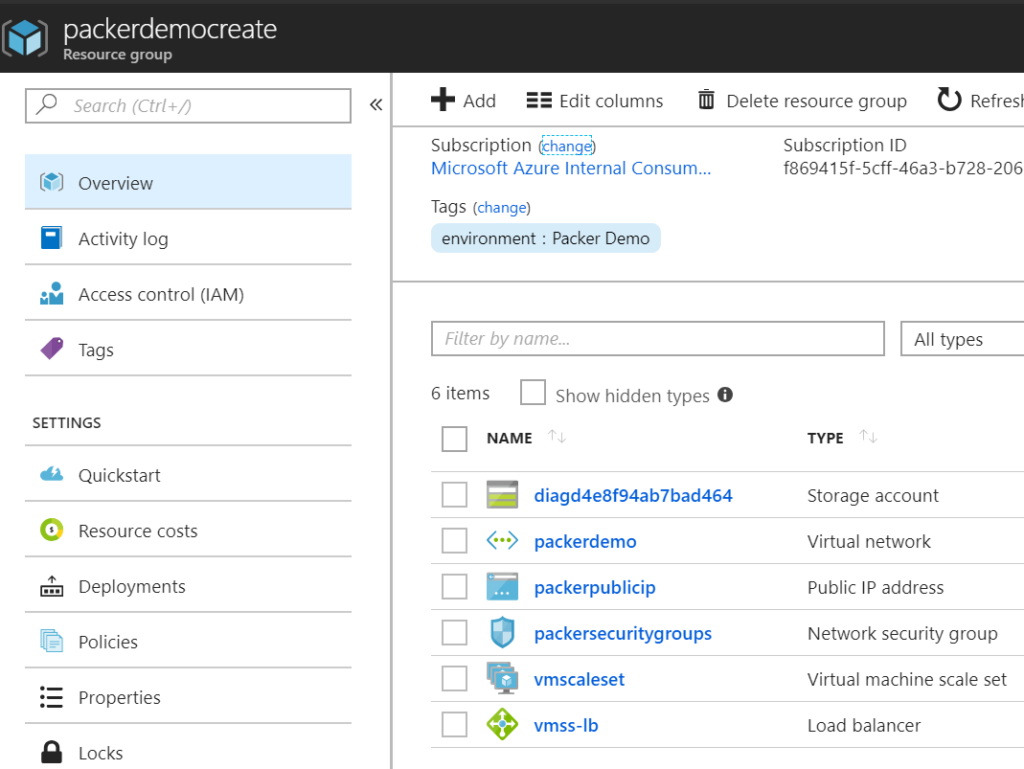
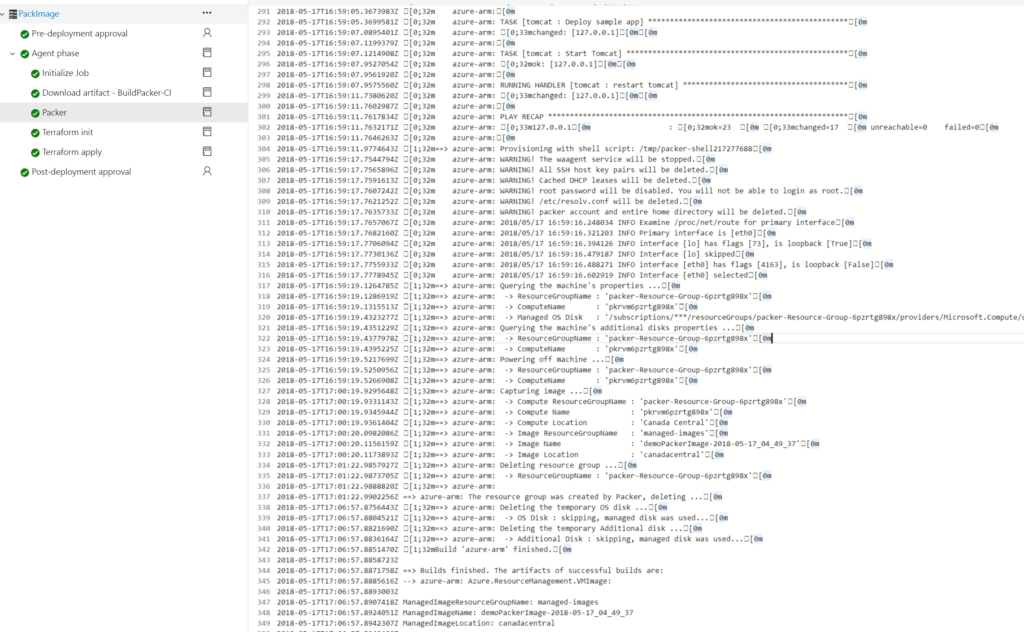 The newly created image could be verified in the resource group (“managed-disks” in our example).
Each image has timestamp as a suffix that helps to identify images for rollback and promotion (could use git hash or tag for traceability to source control).
 Next step is provisioning infrastructure using Terraform:
b. Shell Script – Terraform Init
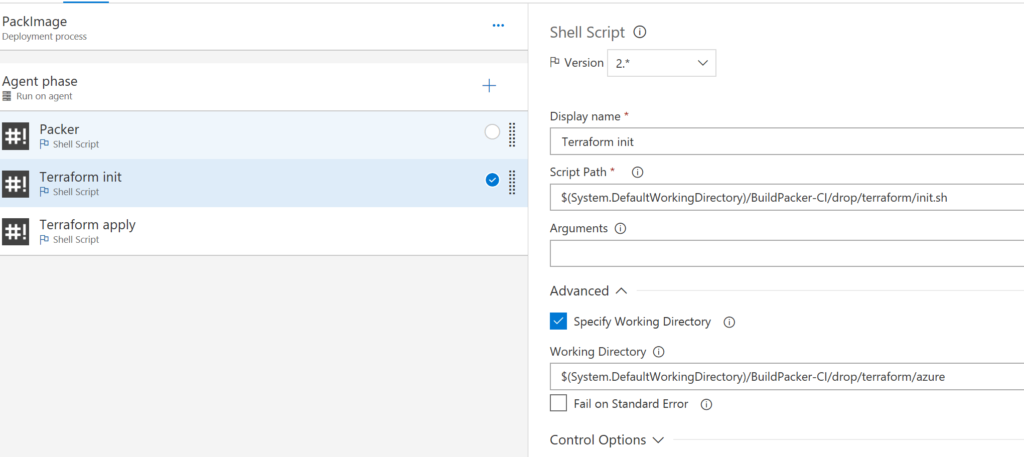 Terraform must initialize Azure Resource provider and the configured backend for keeping the state (Azure storage in this example) before the use. Here is the snippet doing it from our Terraform template:
terraform {
  required_version = ">= 0.11"
  backend "azurerm" {}
}
# Configure the Microsoft Azure Provider
provider "azurerm" {}
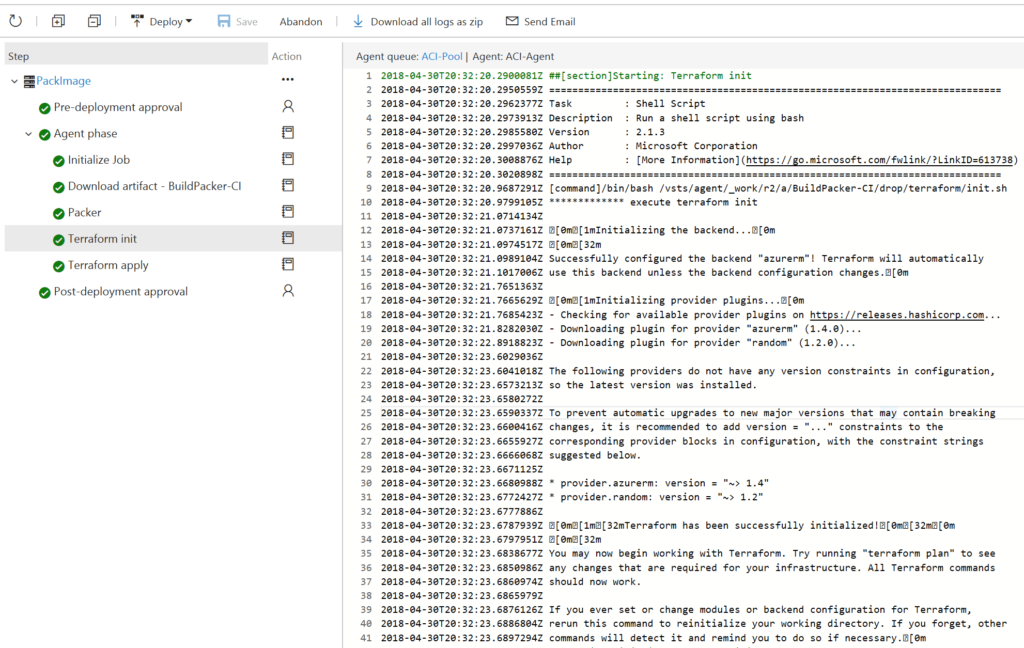
Terraform initialization can be done by simply running “terraform init” command.
To avoid hard coding backend storage in the Terraform template, we are using a partial configuration and providing the required backend configuration in variables file – “backend.tfvars.” Here a is configuration that uses a storage account we created as part of the prerequisites:
storage_account_name = "vstsbuildterraform"
container_name = "terraform-state"
key = "demo-packer.terraform.tfstate"
To initialize Terraform shell script will run init command with provided backend configuration:
#!/bin/bash
terraform init  -backend-config=backend.tfvars
Upon a successful run it will have following output indication that Terraform has been initialized.
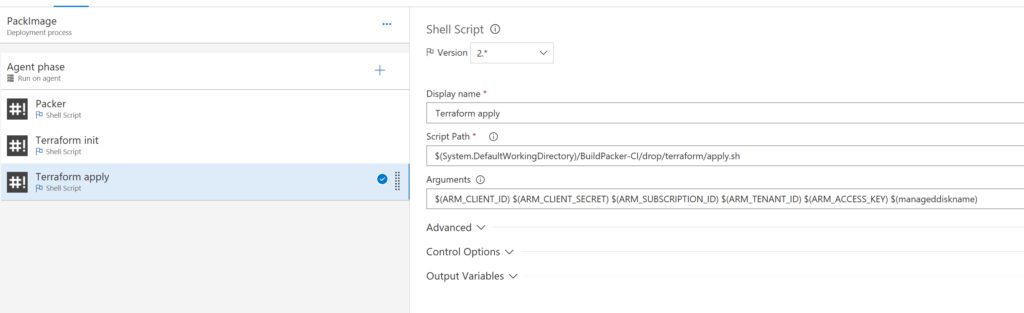
 c. Shell Script – Terraform apply
Terraform apply will apply the changes required to reach the desired state of the configuration as defined by “main.tf.”
 Terraform generates an execution plan describing what it will do to reach the desired state, and then executes it to build the described infrastructure. As the configuration changes, Terraform is able to determine what changed and create incremental execution plans that can be applied.
In the example below, Terraform detected that some changes are required in the infrastructure.
 The shell file executes the Terraform build and uses the build by Packer ManagedDisk name to locate the image used in the VM scale set.
terraform apply -auto-approve -var "manageddiskname=$6"
The full Terraform template can be found in GitHub.
It provisions the resource group, virtual network, subnet, public IP, load balancer and NAT rules, and VM scale set.
Here is the definition of VM scale set, pointing to the Packer image. Resources that are not created by Terraform are referred to as “data” definition as opposed to “resource.”
# Points to Packer build image
data "azurerm_image" "image" {
  name                = "${var.manageddiskname}"
  resource_group_name = "managed-images"
}
# Create virtual machine sclae set
resource "azurerm_virtual_machine_scale_set" "vmss" {
  name                = "vmscaleset"
  location            = "${azurerm_resource_group.demo_resource_group.location}"
  resource_group_name = "${azurerm_resource_group.demo_resource_group.name}"
  upgrade_policy_mode = "Automatic"
  sku {
    name     = "Standard_DS1_v2"
    tier     = "Standard"
    capacity = 2
  }
  storage_profile_image_reference {
    id = "${data.azurerm_image.image.id}"
  }
  storage_profile_os_disk {
    name              = ""
    caching           = "ReadWrite"
    create_option     = "FromImage"
    managed_disk_type = "Premium_LRS"
  }
  os_profile {
    computer_name_prefix = "myvm"
    admin_username       = "azureuser"
    admin_password       = "xxxx"
  }
  os_profile_linux_config {
    disable_password_authentication = true
    ssh_keys {
      path     = "/home/azureuser/.ssh/authorized_keys"
      key_data = "ssh-rsa xxxx"
    }
  }
  network_profile {
    name    = "terraformnetworkprofile"
    primary = true
    ip_configuration {
      name                                   = "IPConfiguration"
      subnet_id                              = "${azurerm_subnet.demo_subnet.id}"
      load_balancer_backend_address_pool_ids = ["${azurerm_lb_backend_address_pool.bpepool.id}"]
    }
  }
  tags {
    environment = "Terraform Demo"
  }
}
Provisioned infrastructure will look like this:
 As a result of the build, we have a Spring Boot application up and running on an Azure VM scale set and it could be scaled up and down quickly, according to demand.
Conclusion
In this example, we demonstrated a simple flow that provides application deployment and infrastructure automation, and builds the immutable image that can be promoted between environments. The build history is stored in the Azure resource group and each image is tagged, and could be rolled back very easily by pointing the VM scale set to a previous version. In the next article we will demonstrate more complex flow, incorporating planning, approving, verifying policies, and testing infrastructure.
Note: There is a “Packer” task available on VSTS marketplace, Currently it does not support managed disks, enhancement is coming and we will be able to replace the shell script.